This article shows a step-by-step guide to set up a leave type.
To generate it for employees, you need to refer to Generate Leave Entitlement.
Step 1
On the left menu, go to Setting (a) > Leave (b) > Leave Type (c)

Step 2
Click Add New on the top right corner of the page.

Step 3
Fill in basic details.
a) Leave Name: Enter the name of the leave (e.g., Annual Leave).
b) Label: A shorter label used across the system (e.g., AL).

Step 4
Under General Setting, you will find four (4) key tools:

a) Leave Entitlement Pairing - If two leaves are paired together, this means when an employee applies for either one of the leaves, the other leave type entitlement will also be deducted accordingly. The system will follow the higher leave entitlement between the two when calculating available leave. Don't select if there is no need for pairing.
Example: When an employee takes an 'Emergency Leave', it will be deducted from the 'Annual Leave' entitlement as well.
Note: Pairing is not a total combination leave entitlement. When paired, the leave type that has greater entitlement will tend to be reduced whenever the leave type that is paired with has lower entitlement is used.
b) Day Types Included in Leave Taken - Select whether Off Day, Rest Day, or Holiday should be included in the leave calculation. If ticked, these non-working days will still be counted as leave taken.
Example: If ‘Off Day’ is checked, applying leave from Friday to Monday will be counted as 3 days (including the off-day), not 2.
c) Leave Rounding Method - Choose how to round off decimal leave balances:
- None: Keep exact values (e.g., 5.5 days).
- Up: Round up (e.g., 5.5 → 6 days).
- Down: Round down (e.g., 5.5 → 5.0 days).
d) Custom Approval Route - Allow custom approval flow by setting a single or multiple custom route specific to this leave type. Toggling this off, approval flow will follow the default approval workflow based on Setting > General > Approval Workflow.
- Single: all requests for this leave type will be routed to the same approver(s).
- Multiple: Select and rank multiple existing approval workflows for this leave type. When a request is submitted, the system checks each workflow in priority order and follows the first one where the requestor meets the criteria.
Step 5
Under Employee Self Service Policy section, you can define the rules when employees apply for this leave.
a) Minimum Days required for Leave Request: The minimum number of leave days employees can request (e.g., 0.5). We recommend using whole or half-day increments.
b) Maximum Days allowed for Leave Request: The maximum number of leave days employees are allowed to request at one time.

c) Unplanned Leave Behavior: Unplanned Leave Behavior defines how the system handles leave requests that don’t meet the minimum advance notice or backdate limit set in the leave type settings.
Read more about Unplanned Leave Behavior here: Unplanned Leave Behaviord) Application for Future Leave – Set the minimum number of days in advance that employees must apply for leave before the leave date.
e) Application for Back Dated Leave – Set how far back employees are allowed to apply for leave.
Step 6
Select which fields appear on the leave application form, and set them as optional or mandatory.

Note: Ticking Covering Person means employees must assign someone to cover them.
- The covering person cannot apply for leave on the same date they’re assigned to cover someone else.
- A covering person can only be assigned to one employee per day, they won’t be available to cover multiple colleagues on the same date.
- When a covering person is selected, the leave request must first be approved by the covering person. Only after that will it proceed to the next approver in the approval workflow.
Step 7
You will find tools as below. Choose either Yes or No based on your leave policy or requirements.
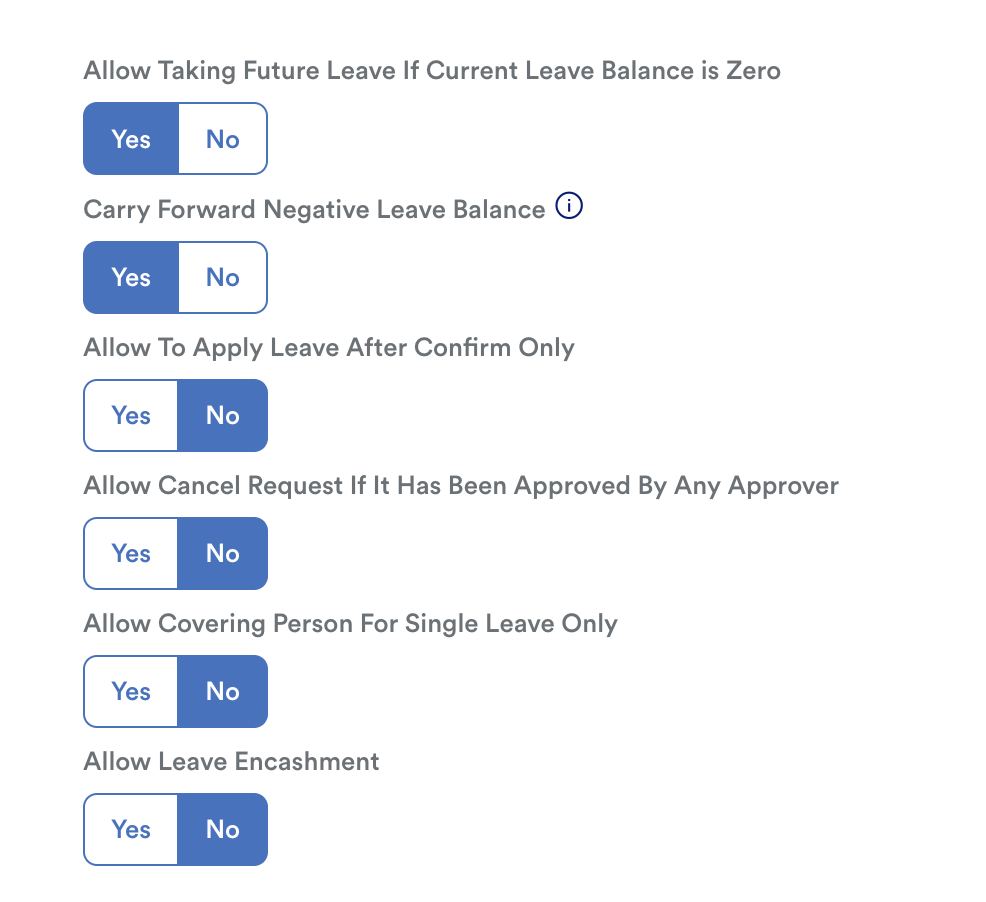
- Allow Taking Future Leave if Current Leave Balance is Zero – enables employees to apply for future leave dates even if their current leave balance is zero. Useful for setups where leave is earned monthly or yearly and will be credited before the leave date.
- Carry Forward Negative Leave Balance - allows overutilized leave or time off (negative balance) to be carried forward into the next year. The negative balance will be deducted from the following year total leave entitlement. Refer: Carry Forward Negative Leave
- Allow to Apply Leave After Confirm only – restricts leave applications to confirmed employees only. Employees in probation cannot apply for this leave type.
- Allow Cancel Request If It Has Been Approved by Any Approver - Allow to cancel the request even if it's been approved.

- Allow Covering Person For Single Leave Application Only – A covering person can only be assigned to one leave application at a time.
- Allow Leave Encashment – When allowed, this leave type will be available in the Year-End Leave screen for balance conversion and pull it into payroll.
Step 8
In Leave Info Display section, you can choose where this leave type will appear in:

a) Display Leave Balance in My Request:
if checked: the leave balance for this leave type will be shown in the My Request screen, together with pending and takenleave information.
If unchecked: only pending and taken leave information will be shown.
b) Display Leave Balance in My Individual Leave:
If checked: the leave balance for this leave type will be shown in the My Individual Leave screen.
If unchecked: only pending and taken leave information will be shown.
c) Display Leave Balance in My Leave History:
If checked: the leave balance for this leave type will be shown in the My Leave History screen.
If unchecked: only pending and taken leave information will be shown.
d) Display in Payslip:
If checked: the payslip will display this leave type with Pending, Taken and Year-to-Date (YTD) Entitlement.
You must assign the leave type to a display position:
– First row
– Second row
– Others (3rd row onwards, Advanced layout only)If unchecked: this leave type will not appear in the payslip.
Read how to manage leave type display here: Leave Type Display in PayslipStep 9
Under Entitlement Policy section, you’ll see the following configuration tools:

a) Entitlement Calculation is Based On:
- Calendar Month – Based on a fixed 12-month cycle (e.g., Jan–Dec).
- Calendar Year – Based on the employee’s year of service.
- Employee Anniversary Year – Based on the employee’s joining month and year.
- Employee Hire Date – Based on hire date.
- Refer to Leave Entitlement Calculation Method
b) Leave Earning Method:
- None – Full entitlement given upfront (pro-rated if needed).
- By Month – Entitlement earned monthly, available after the month ends.
- By Year – Entitlement earned after completing one year of service.
- Refer to Leave Earning Method
c) Leave Bring Forward Method:
- Refer to - Setting up Leave Bring Forward
d) Leave Bring Forward Will Expires Within:
- Specify the number of months or days after which the carried forward leave will expire.
e) Employee Progression Prorate
- Automatically adjusts leave entitlement when an employee goes through progression during the leave cycle with a different leave entitlement.
- This setting works together with the Leave Earning Method and Entitlement Calculation settings.
- Check this box to ensure entitlement reflects changes across the year.
- Uncheck this box to apply only the most recent setting without proration.
Step 10
This section allows you to automate generate leave entitlements for existing staff and/or new joiners, and choose how often it runs (daily, weekly, or monthly).
Refer to this article to learn more about the leave scheduler: Setting Up Leave Scheduler
If your leave earning is by monthly, you’ll see the Scheduler Generate Until option:
- Previous Month: When the scheduler runs (e.g. on 1 July), it will generate leave up to 30 June.
- Current Month: When the scheduler runs (e.g. on 1 July), it will generate leave up to 31 July.
Note: This setting helps you control how far ahead the system should generate leave entitlements based on your company’s policies. Once you have set up this field, you won't have to manually generate leave anymore.
Click Continue and you will be brought to the next page of Entitlements.
Step 11
Click on Add Entitlement.

Step 12
Here, you can create an entitlement table based on years of service:
a) Entitlement Name: Name the group (e.g., Contract Staff Entitlement).
b) Add Row: Insert multiple tiers (e.g., 0–1 year = 12 days, 2–5 years = 14 days).

Note: Max (Entitle + BF) Days should not equal to 0. This will make your entitlement = 0.
c) Copy Setting: Use this to duplicate entitlement settings from another leave type.

Step 13
Then, choose the staff that are entitled for the leave. You can choose from four (4) selection methods:

a) All Available Users - Select from all users registered in the system. Use the filters on the left-side panel to include or exclude specific employees as needed.
b) Teams - Assign employees based on Teams created.
c) Manual Selections - Search and select individual employees manually. Use the Search Filter on the left panel, then click the + / – buttons to add or remove employees from the list.
d) Import Selections - Bulk import employee selections by either:
- Pasting your records into the provided field, or
- Click Upload button to upload a file.
Step 14
You will be directed to the Priority section, where you’ll see:
- Priority
- Entitlements
- Criteria
- Eligible employees

Lastly, click Save to complete the setup. Now you’ve successfully set up a new leave type!
After done setting up, you may proceed to Generate Leave Entitlement so employees can start to apply leave.
We hope this explanation clarifies the matter. If you require additional assistance, do not hesitate to contact our support team.
Was this article helpful?
That’s Great!
Thank you for your feedback
Sorry! We couldn't be helpful
Thank you for your feedback
Feedback sent
We appreciate your effort and will try to fix the article